"Tile Cutter"

Terrain / Theater editing

Moderators: Lone Wolf, Snake Man

User avatar
Sherlock
Lt. General
Posts: 1167
Joined: 2006-05-24 22:01:01
Gaming Interests: Falcon 4.0
Editing Interests: All, I (try) to edit everything.
Location: Arizona, USA

"Tile Cutter"

Post by Sherlock » 2008-01-08 22:08:23

source link: http://mapki.com/wiki/Tile_Cutter

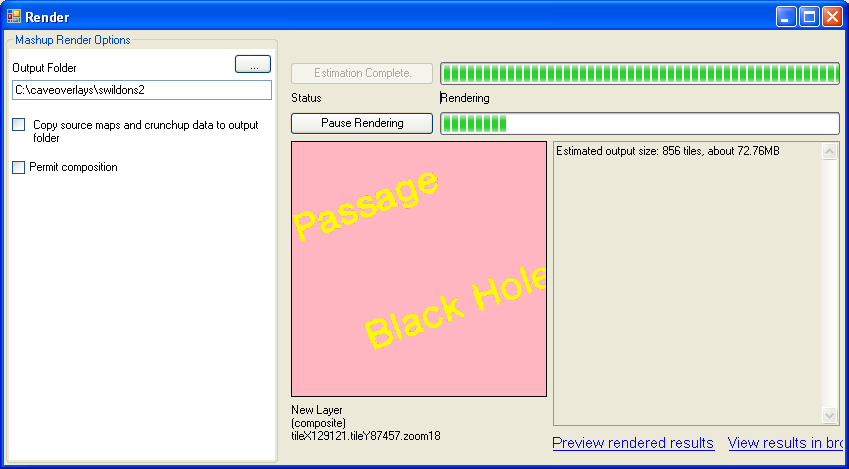
This c# program reads in one geo-referenced source image and automatically produces a set of 256x256 tiles ready for use in a custom map layer or overlay. The code uses some functions from the Java Tile Utilities on the MAPKI Tile utility code in Java. You can download a free copy of c# from Microsoft [1] .

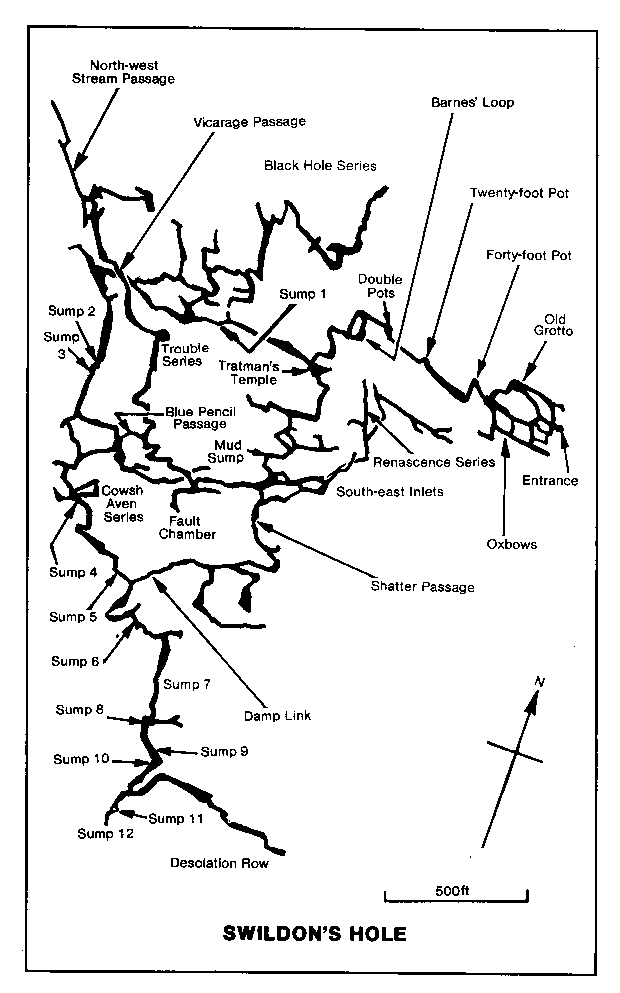
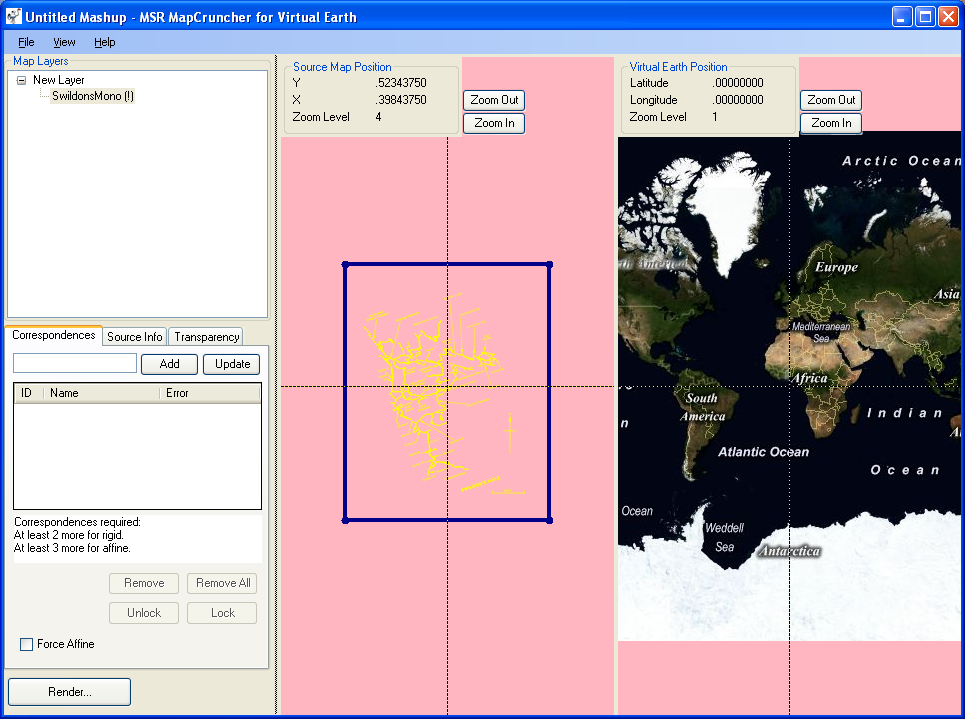
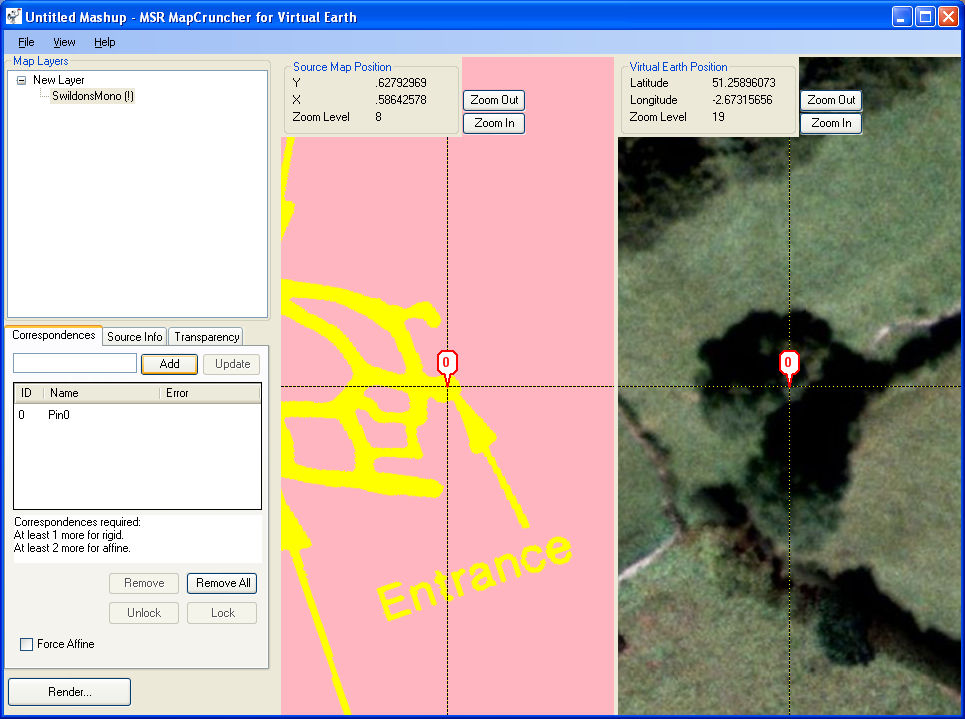
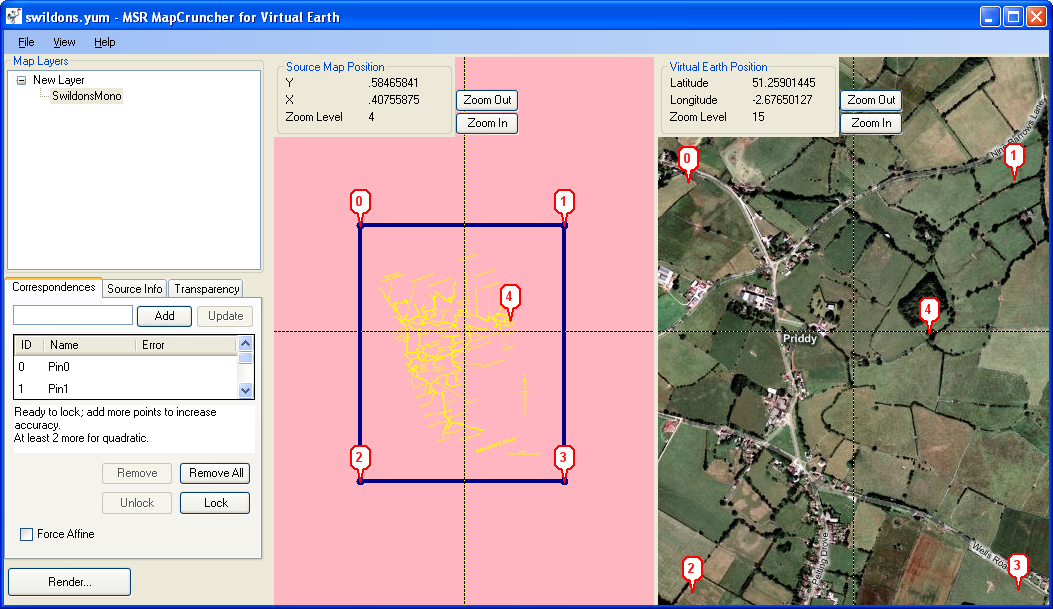
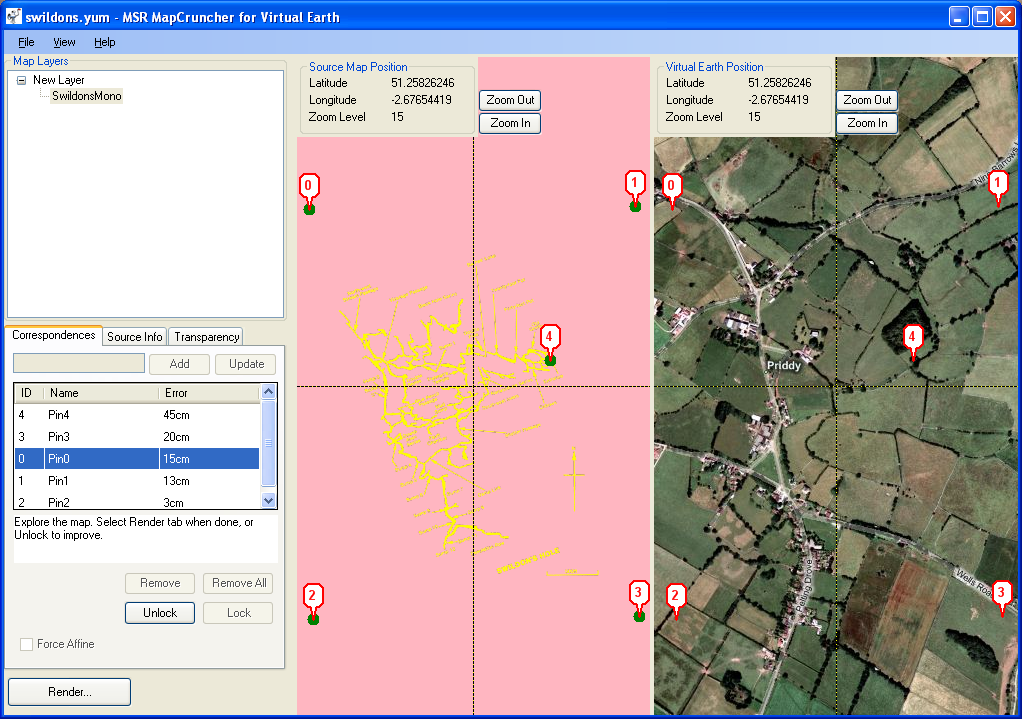
The input image needs to have an ESRI format World File [2] and be in WGS84 geographic coordinates, that is each pixel is a fixed size in latitude and longitude. Global Mapper [3] is a great tool for producing suitable input images from a variety of sources such as SRTM terrain data [4]. I have used it together with the code here to generate the terrain overlays that you can see at [5]

The code as shown cuts tiles at the source image's natural Google zoom level and two zooms either side (no interpolation / smoothing yet). As programmed the code only writes tiles that are fully inside the source image. The iteration finds partially intersecting margin tiles but does not output them. Changing the code to include the margin tiles would be easy, putting black or transparent in the pixels that have no equivalent in the source.

On your page's java script, use a function like this to supply tiles in your custom layer.

Code: Select all

function customGetTileUrl(a,b) {
 var f = "http://www.mysite.com/mytiles/z" + b + "x" + a.x + "y" + a.y + ".jpg";
 return f;
}
To create a hybrid tile layer with the Google's MAP use code like this (11 and 12 are min and max zoom levels for your tiles) 


function loadLayer {
 var tilelayers = new Array();
 tilelayers[0] = G_NORMAL_MAP.getTileLayers()[0];
 tilelayers[1] = new GTileLayer(copyrightCollection , 11, 12);// see MAPKI for copyright management
 tilelayers[1].getTileUrl = customGetTileUrl;
 tilelayers[1].getOpacity = function () {return 0.5;};
 var custommapmap = new GMapType(tilelayers, new GMercatorProjection(13), "MyTiles+Map", {errorMessage:"No data available"});
 map.addMapType(custommapmap);
}
Here is the c# source code

Code: Select all


using System;
using System.Collections.Generic;
using System.Text;

namespace TileCutter
{

/**
* A set of simple routines to provide information about google tiles (API v2).
* Internally a sort of offset mercator projection is used (as per google), this places the origin (0,0)
* at the top left and goes to +1,+1 at the bottom right.
* A proper mercator would have 0,0 in the middle and range from -0.5,-0.5 bottom left to +0.5,+0.5 top right.
*/
   public class GoogleTileUtils
   {
       public static int TILE_SIZE = 256;

       /**
        * Returns the pixel offset of a latitude and longitude within a single typical google tile.
        * @param lat
        * @param lng
        * @param zoom
        * @return
        */
       public static System.Drawing.Point getPixelOffsetInTile(double lat, double lng, int zoom)
       {
           System.Drawing.Point pixelCoords = toZoomedPixelCoords(lat, lng, zoom);

           return new System.Drawing.Point(pixelCoords.X % TILE_SIZE, pixelCoords.Y % TILE_SIZE);
       }

       /**
       * returns a Rectangle2D with x = lon, y = lat, width=lonSpan, height=latSpan
       * for an x,y,zoom as used by google.
       */
       public static System.Drawing.RectangleF getTileRect(int x, int y, int zoom)
       {
           int tilesAtThisZoom = 1 <<zoom> 180)
           {
               lng -= 360;
           }

           lng /= 360;
           lng += 0.5;

           lat = 0.5 - ((Math.Log(Math.Tan((Math.PI / 4) + ((0.5 * Math.PI * lat) / 180))) / Math.PI) / 2.0);

           return new System.Drawing.PointF((float)lng, (float)lat);
       }

       /**
        * returns a point that is a google tile reference for the tile containing the lat/lng and at the zoom level.
        * @param lat
        * @param lng
        * @param zoom
        * @return
        */
       public static System.Drawing.Point toTileXY(double lat, double lng, int zoom)
       {
           System.Drawing.PointF normalised = toNormalisedPixelCoords(lat, lng);
           int scale = 1 << zoom;

           // can just truncate to integer, this looses the fractional "pixel offset"
           return new System.Drawing.Point((int)(normalised.X  * scale), (int)(normalised.Y  * scale));
       }

       /**
        * returns a point that is a google pixel reference for the particular lat/lng and zoom
        * @param lat
        * @param lng
        * @param zoom
        * @return
        */
       public static System.Drawing.Point toZoomedPixelCoords(double lat, double lng, int zoom)
       {
           System.Drawing.PointF normalised = toNormalisedPixelCoords(lat, lng);
           double scale = (1 << zoom) * TILE_SIZE;

           return new System.Drawing.Point((int)(normalised.X * scale), (int)(normalised.Y * scale));
       }

   }

   /**
   * routines to read in an ESRI world file for a geographic projection
   */
   public class WorldFile
   {
       //returns a PointF with x = left , y = top , width = units per pixel x, height = units per pixel y
       // for a Geo file this is lon , lat, degrees per pixel lon, degrees per pixel lat
       public static System.Drawing.RectangleF readWorldFile(string file)
       {
           try
           {
               System.IO.StreamReader sr = new System.IO.StreamReader(file);
               string[] lines = new string[6];
               for (int i = 0; i <6> GoogleTileUtils.TILE_SIZE)
           {
               pixIn360 /= 2;
               zoom += 1;
           }

           // iterate around the natural zoom
           for (int z = (zoom - 2); z <zoom>= 0) && (z <= 17))
               {

                   // find the intersecting google tiles
                   //zoom 0 is 1 tile,
                   //zoom 1 is 4 tiles etc

                   System.Drawing.Point tbl = GoogleTileUtils.toTileXY(inGeoRect.Bottom, inGeoRect.Left, z);
                   System.Drawing.Point ttr = GoogleTileUtils.toTileXY(inGeoRect.Top, inGeoRect.Right, z);
       

                   // for each intersecting tile
                   int tilesAtThisZoom = 1 << z;
                   for (int x = tbl.X ; x <= ttr.X ; x++)
                   {
                       for (int y = ttr.Y; y <= tbl.Y ; y++)
                       {
                           System.Drawing.Bitmap bm = new System.Drawing.Bitmap(GoogleTileUtils.TILE_SIZE, GoogleTileUtils.TILE_SIZE, gr);
                           bool bWrite = true;                    
       
                           // get pixels from the input image to go in the output tile
                           for (int py = 0; (py < bm.Height) && (bWrite); py++)
                           {
                               //get lat of this pixel
                               float my = (y + (((float)py) / ((float)GoogleTileUtils.TILE_SIZE))) / tilesAtThisZoom;//normalised mercator height
                               float pla = (float)((180 / Math.PI) * ((2 * Math.Atan(Math.Exp(Math.PI * (1 - (2 * my))))) - (Math.PI / 2)));
                               //y coord of pixel in input image
                               int iy = (int)Math.Round(inImage.Height * ((pla - inGeoRect.Bottom) / (-inGeoRect.Height)));
                               iy = inImage.Height - iy;

                               for (int px = 0; (px <bm>= 0) && (ix <inImage>= 0) && (iy < inImage.Height))
                                       bm.SetPixel(px, py, inImage.GetPixel(ix, iy));
                                   else
                                       bWrite = false;//only want complete tiles
                               }
                           }

                           // make up the output tile's filename
                           // save the output tile
                           if (bWrite)
                           {
                               string fn = "z" + z.ToString() + "x" + x.ToString() + "y" + y.ToString() + ".jpg";

                               EncoderParameters eps = new EncoderParameters(1);
                               eps.Param[0] = new EncoderParameter(System.Drawing.Imaging.Encoder.Quality, (long)90);
                               ImageCodecInfo ici = getCodec("image/jpeg");                                
                               bm.Save(outPath + "/" + fn + ".jpg", ici ,eps);

                               //bm.Save(outPath + "/" + fn + ".png",ImageFormat.Png);
                               //bm.Save(outPath + "/" + fn + ".gif", ImageFormat.Gif);

                               //ici = getCodec("image/tiff");
                               //System.Drawing.Imaging.Encoder enc = System.Drawing.Imaging.Encoder.Compression;
                               //eps.Param[0] = new EncoderParameter(enc,(long)EncoderValue.CompressionLZW);
                               //bm.Save(outPath + "/" + fn + ".tif", ici, eps);


                           }
                           
                       }
                   }
               }

           }
           
       }
   

       private static ImageCodecInfo getCodec(string mimeType)
       {
           ImageCodecInfo[] encoders = ImageCodecInfo.GetImageEncoders();
           for(int j=0;j<encoders.Length;j++)
               {
                   if(encoders[j].MimeType == mimeType)
                   return encoders[j];
               }
           return null;
       }

   }
}
References:

1. http://msdn2.microsoft.com/en-us/vstudio/aa700757.aspx
2. http://www.kralidis.ca/gis/worldfile.htm
3. http://www.globalmapper.com/
4. http://www2.jpl.nasa.gov/srtm/cbanddataproducts.html
5. http://www.bdcc.co.uk/mendip.html


I thought maybe some of the brighter guys running around these forums maybe could build on this idea and code base to create something useable for Falcon theater builders.... :)
Sherlock
Victurous te Saluto

ranger822
Banned user
Posts: 389
Joined: 2004-07-27 22:01:01
Gaming Interests: Falcon 4.0
Editing Interests: All, I (try) to edit everything.
Location: Beautiful Virginia

Easy Tiles?

Post by ranger822 » 2008-01-09 18:06:35

This sounds interesting . . . be nice to snap up some terrain tiles the easy way if they could translate to our dem/coordinates, etc ...

The only problem at the moment with a source like GE is their imagery isn't complete - looks like a patchwork quilt . . . so tiles can only be made for small areas without having to come up with some way to color adjust to to adjacent terrain.

Do you have some other ideas for a tile cutter tool if you can get it working - - - lay it out dude . . . :D :D :D

User avatar
Sherlock
Lt. General
Posts: 1167
Joined: 2006-05-24 22:01:01
Gaming Interests: Falcon 4.0
Editing Interests: All, I (try) to edit everything.
Location: Arizona, USA

Re: Easy Tiles?

Post by Sherlock » 2008-01-09 18:10:00

ranger822 wrote:This sounds interesting . . . be nice to snap up some terrain tiles the easy way if they could translate to our dem/coordinates, etc ...

The only problem at the moment with a source like GE is their imagery isn't complete - looks like a patchwork quilt . . . so tiles can only be made for small areas without having to come up with some way to color adjust to to adjacent terrain.

Do you have some other ideas for a tile cutter tool if you can get it working - - - lay it out dude . . . :D :D :D
Ranger,
take a look at the link given in the first post for reference #5. Then move the GE position over to Israel. There is very nice (IMO) very high resolution imagery of sections of Israel. Then ask yourself: "Am I thinking what Sherlock's thinking?" ;)
Sherlock
Victurous te Saluto

ranger822
Banned user
Posts: 389
Joined: 2004-07-27 22:01:01
Gaming Interests: Falcon 4.0
Editing Interests: All, I (try) to edit everything.
Location: Beautiful Virginia

Hum?

Post by ranger822 » 2008-01-09 23:29:32

Looking at ref. 5 and shifting to Sinai there are some parts that may be worth trying out: a few issues to look into further:

1. Copyright 2008 Google Watermarks every 500m in every direction
2. Terrain tile size that we can directly lift appears to be approximately 256 (no better - which may be okay and better than we have now)
3. Other parts of terrain map will need to have transitions along a ver long border - or color adjustments - - whew that is going to be a BITC@!
4. Still need to figure out a translation method for or terrain to get it to match up . . . it doesn't have to be perfects - but there are bound to be some misfittings (just a guess) and that will need to be factored in.

but hey maybe we can try out a section to see how it looks? Mabye i.d an airbase for tiles?

ccc
Chief of Staff
Posts: 4857
Joined: 2000-08-06 22:01:01

Post by ccc » 2008-01-10 01:54:49

ya the tool sounds cool.

i'd suggest test tiles at airbase or hot combat zone first. forget the transitional tiles ATM.

btw.. no easy job to overcome the frustrating watermark thing.

User avatar
Sherlock
Lt. General
Posts: 1167
Joined: 2006-05-24 22:01:01
Gaming Interests: Falcon 4.0
Editing Interests: All, I (try) to edit everything.
Location: Arizona, USA

Re: Hum?

Post by Sherlock » 2008-01-10 04:17:07

ranger822 wrote: ...a few issues to look into further:
ranger822 wrote: 1. Copyright 2008 Google Watermarks every 500m in every direction
Ok, I guess I am a little dense because I'm not seeing these in my view:

(the following images were taken at about 5K feet "eye" altitude using the GoogleEarth program; it has more functionality than the reference #5 link above and it uses the same satellite imagery data)

Aqaba International on the eastern Sinai:

Image

Ben Gurion International Airport in northern Israel:

Image
ranger822 wrote: 2. Terrain tile size that we can directly lift appears to be approximately 256 (no better - which may be okay and better than we have now)
How did you figure this out? If H tiles represent about 1Km square shouldn't the zoom be sized based on the google earth legend bar? And based on the tiles I made for Iran the pictures had many more pixels than 256....? Please enlighten me here since I am lost in how you did this.. :)
ranger822 wrote: 3. Other parts of terrain map will need to have transitions along a ver long border - or color adjustments - - whew that is going to be a BITC@!
Agreed. Again due to the "banding" introduced by the satellite. We may want to rediscuss this. I have a couple of ideas to maybe get around part of this problem.
ranger822 wrote: 4. Still need to figure out a translation method for or terrain to get it to match up . . . it doesn't have to be perfects - but there are bound to be some misfittings (just a guess) and that will need to be factored in.
Are you talking about dicing up the terrain pics into tiles here and then trying to get them to line up again properly in sim? (I'm not clear on what you mean here...)
ranger822 wrote:but hey maybe we can try out a section to see how it looks? Mabye i.d an airbase for tiles?
Agreed. Ben Gurion looked like the best airport on my quick scan of the most visible ones. What do you think?
Sherlock
Victurous te Saluto

ranger822
Banned user
Posts: 389
Joined: 2004-07-27 22:01:01
Gaming Interests: Falcon 4.0
Editing Interests: All, I (try) to edit everything.
Location: Beautiful Virginia

Re: Hum?

Post by ranger822 » 2008-01-11 18:03:55

sherlock wrote: Ok, I guess I am a little dense because I'm not seeing these in my view:
You are definitely not dense - I am not being very clear in my explanation. I think we may be seeing two different things - maybe our viewers are different. I will see about posting a pic of what I see in Ref. 5 viewer. What I am seeing are Copyright 2008 Google watermarks about every 500 meters in all directions on the map/imagery. If you can extract the imagery without this "water-mark" that is great.
ranger822 wrote: 2. Terrain tile size that we can directly lift appears to be approximately 256 (no better - which may be okay and better than we have now)
sherlock wrote: How did you figure this out? If H tiles represent about 1Km square shouldn't the zoom be sized based on the google earth legend bar? And based on the tiles I made for Iran the pictures had many more pixels than 256....? Please enlighten me here since I am lost in how you did this.. :)
It is an estimate. I will see about making a screen capture of the terrain taken with the 500m scale then see what actual resolution that is. I am just guessing based on the size of the image that it is about 256x256 pixels because it is about 2inches square on my screen.
ranger822 wrote: 4. Still need to figure out a translation method for or terrain to get it to match up . . . it doesn't have to be perfects - but there are bound to be some misfittings (just a guess) and that will need to be factored in.
sherlock wrote:Are you talking about dicing up the terrain pics into tiles here and then trying to get them to line up again properly in sim? (I'm not clear on what you mean here...)
Yes - that is what I mean - - be really nice for coastal if it could be done. Same for desert and mountain areas - just don't know how it will work at the moment until it is tried.
ranger822 wrote:but hey maybe we can try out a section to see how it looks? Mabye i.d an airbase for tiles?
sherlock wrote:Agreed. Ben Gurion looked like the best airport on my quick scan of the most visible ones. What do you think?
Sure Ben Gurion is fine to start - but any airbase with good imagery around it for about 6 kilometers in any direction would probably be fine.

User avatar
Sherlock
Lt. General
Posts: 1167
Joined: 2006-05-24 22:01:01
Gaming Interests: Falcon 4.0
Editing Interests: All, I (try) to edit everything.
Location: Arizona, USA

Post by Sherlock » 2008-01-26 07:14:41

Here is another related very interesting topic:
-----------------------------------------------------------

This page demonstrates how to use Microsoft Research's (MSR) MapCruncher to generate custom tile sets for use by the Google Map API. The licence for MSR MapCruncher only permits the use of generated tiles for non-commercial use. You will find MapCruncher at http://research.microsoft.com/mapcruncher/ . It will produce tile sets from various formats of source image, including PDF.

Bill Chadwick October 2007

STEP 1 - SOURCE A MAP

Here is a sample map that has been scanned from a book (with consent of the author).

Image


STEP 2 - PREPARE YOUR MAP FOR CRUNCHING

The next step is to tidy up your source map with an image editing program. Its best to rotate your map so that North points straight up the screen. If you want your map background to be transparent, use png format and select the transparent colour as the background. If your map is diagrammatic, like mine, rather than photographic, its best to reduce it to 256 colours. Here is the sample map above after it has been tidied up, yellow works well as on overlay on the satellite map.

Image

STEP 2 - PRELIMINARY REGISTRATION WITH MAP CRUNCHER

Start up MapCruncher and use the File menu - New Mashup option . Next use the File menu - Add Source Map option and load your tidied map.

Your MapCruncher window should now look something like this. MapCruncher uses pink for transparent portions of your source image.

Image

What you do next is set the source map cross hairs to several points on your map and the cross hairs on the Virtual Earth (VE) map to the corresponding points on the ground. For each correspondence, press the Add button on the Correspondences tab to add correspondence Pins. Its best to use about 6 Pins and include a Pin near each corner of your map. At this stage your map and the VE map are not synchronised and you pan and zoom them independently.

Now I have deliberately made this example difficult by using a cave! Only the entrance sticks a chance of being visible on the map. The next image shows MapCruncher after I have added the entrance marker. I happen to know that the cave entrance is under this particular tree.

Image

I then proceed to add some further correspondences, one at each corner of the source map. The Pins are very carefully placed exactly on the corners of my source map but only roughly placed on the VE map.

Image

Now save your mashup (as a Yum file), close MapCruncher and proceed to the next step.

STEP 3 - ACCURATE GEOREFERENCING

This step is optional but necessary if you can't set all your correspondences well using MapCruncher. We need to work out the real world coordinates of all the Pins on your source map in WGS84 Lat/Lon. To do this you need to know the size of your image in pixels and the scale of your map in say metres per pixel. From one known location on your map, the cave entrance in my case, we can then work out the coordinates of each corner (having previously rotated the map so that North is straight up).

For my sample map I get a set of UK Ordnance Survey grid coordinates which I can convert to Lat/Lon. I use a Spread Sheet for this, here is the sheet for the current example.

Entrance Eastings Entrance Northings
353120 151310

Image Pixel Width Image Pixel Height
3643 4565
Entrance Pixel X Entrance Pixel Y
2676 1704


Scale Bar Feet Scale Bar Pixels
500 568

Scale Bar Metres
152.4

Metres Per Pixel
0.268309859


Top Left East 352402.0028
Top Left North 151767.2
Top Right East 353379.4556
Top Right North 151767.2
Bottom Left East 352402.0028
Bottom Left North 150542.3655
Bottom Right East 353379.4556
Bottom Right North 150542.3655


Top Left Lat 51.26301069
Top Left Lon -2.683591542
Top Right Lat 51.26309161
Top Right Lon -2.669589905
Bottom Left Lat 51.25199624
Bottom Left Lon -2.683428205
Bottom Right Lat 51.25207713
Bottom Right Lon -2.669429913
Entrance Lat 51.25896125
Entrance Lon -2.673241677


To do the conversion for the UK you can use the coordinate converter on the OS Web Site at http://gps.ordnancesurvey.co.uk/convert.asp, or even just use the status bar on my page at http://www.bdcc.co.uk/mendip.html

Having got good accurate Lat/Lon for our reference points we now edit them in to MapCruncher's Yum file.

Open the Yum file with your favourite text editor. For each Pin you will find a bit of XML like this

<PositionAssociation>
<SourcePosition>
<LatLonZoom>
<LatLon>
</LatLonZoom>
</SourcePosition>
<GlobalPosition>
<LatLonZoom>
<LatLon>
</LatLonZoom>
</GlobalPosition>
</PositionAssociation>

For each Pin, edit the values highlighted in red to the computed values, then save the Yum file. Of course if you have good WGS84 registration coordinates for your map from a GIS system, (e.g. an ESRI world file, .jgw, .pgw etc) you can use those figures.

Finally reopen the Yum file with MapCruncher and press the 'Lock' button. You should get something like this.

Image

Ideally for a map on a similar scale to mine your error will be under 50cm (around two pixels at Google zoom level 19).

STEP 4 - PRODUCING TILES

Now select the Source Info tab and set the 'Maximum (Closest) Zoom' to the maximum zoom in you want for your map. For my example I use 19. If you have used a transparent png as your source map, leave the Transparency tab alone, otherwise use it to select colours to make transparent. Next press the Render button to get the Render dialogue. On this, select an output folder and then press the 'Start Estimating' button. Now wait whilst MapCruncher does its clever stuff.

Image

You will find your output tile set in a folder called 'Layer_NewLayer' in your selected output folder something like this

Image

To save server space and improve rendering speed its best to work with 8 bit / 256 colour png tiles wherever possible. Its also worth running pngcrunch, http://pmt.sourceforge.net/pngcrush/ over the output tile set to shrink the tiles to a minimum size.

STEP 5 - GOOGLE MAPS CODE

Very happily, Google Maps and MS Virtual Earth use the same map projection and tiling scheme. Maps start with one 256x256 pixel tile at zoom 0 with Lat/Lon 0,0 in its centre, -90 Latitude at the bottom, +90 at the top, -180 Longitude at the left and +180 Longitude at the right. At zoom 1 the world is divided into four tiles, then 16 at zoom 2 etc.

The MapCruncher tile file names have one digit for each zoom level and use a quadtree format with the digits 0,1,2,3 ( see http://en.wikipedia.org/wiki/Quadtree ). It turns out to be a simple matter to convert the x,y and zoom of a call on the GMap getTileUrl function to a filename in this quadtree format. Here is the Java Script code that does it.

function TileToQuadKey ( x, y, zoom){
var quad = "";
for (var i = zoom; i > 0; i--){
var mask = 1 << (i - 1);
var cell = 0;
if ((x & mask) != 0)
cell++;
if ((y & mask) != 0)
cell += 2;
quad += cell;
}
return quad;
}

Then for your GTileLayer use something like this, of course replacing the URL with your own.

myLayer[0].getTileUrl = function (a,b) {
return "http://www.bdcc.co.uk/cavelayer/" + TileToQuadKey(a.x,a.y,b) + ".png";
};

If your tiles are transparent PNGs then also include code like this.

if(navigator.userAgent.indexOf("MSIE") == -1)
myLayer[0].isPng = function() {return true;};

To add your own map type use code like this for a map with tiles between zoom levels 12 and 19.

var caveLayer = new GTileLayer(new GCopyrightCollection(''),12,19);

caveLayer.getTileUrl = caveTiles;
caveLayer.getCopyright = function(a,b) {return "Irwin & Jarrett, BDCC, MCG, Bill Chadwick 2007";};
caveLayer.isPng = function() {return true;};

var caveMap = new GMapType([caveLayer], G_SATELLITE_MAP.getProjection(), "Caves",{errorMessage:"no caves here"});
caveMap.getTextColor = function() {return "#0000FF";};

map.addMapType(caveMap);

To make a hybrid with your map type and one of the existing maps, the satellite map in this example, use code like this.

var caveHybridLayer = new Array();
caveHybridLayer[0] = G_SATELLITE_MAP.getTileLayers()[0];
caveHybridLayer[1] = new GTileLayer(new GCopyrightCollection('') , 12, 19);
caveHybridLayer[1].getTileUrl = caveTiles;
caveHybridLayer[1].getCopyright = function(a,b) {return "Irwin & Jarrett, BDCC, MCG, Bill Chadwick 2007";};
caveHybridLayer[1].getOpacity = function () {return 0.5;};//of the non transparent part cave
caveHybridLayer[1].isPng = function() {return true;};

var caveSatMap = new GMapType(caveHybridLayer, G_SATELLITE_MAP.getProjection(), 'Caves/Sat',{errorMessage:""});
caveSatMap.getTextColor = function() {return "#FFFFFF";};

map.addMapType(caveSatMap);

isPng should return true if you want to use transparent PNGs. With MSIE 6 you can only have transparency or opacity control, not both. So if you want want to control opacity with MSIE 6 you should make isPng return false. At less than 100% opacity, MSIE 7 will put a small black halo around the opaque part of your transparent overlay. As ever, Firefox does it better.

STEP 6 - YOUR MAP ON LINE

You need to upload your tiles to a folder on your web site www.bdcc.co.uk/cavelayer in my case. If you have crunched more than one map you may want to omit some of the low zoom tiles that cover the same area on the ground. Finally here is the finished online map. Drag the slider by the Caves/Sat map type button to adjust the cave overlay opacity on the Caves/Sat hybrid map. See this page's code (which works fine for Firefox and MSIE7) for more details.

Irwin & Jarrett, BDCC, MCG, Bill Chadwick 2007 - Terms of UseMapSatellite
Show labelsCavesCaves500 ft100 m

For more samples of custom maps and overlays visit this map of Mendip caves. For more of my Google Maps API demos please visit http://www.bdcc.co.uk/Gmaps/BdccGmapBits.htm
------------------------------------------------------------------

This information was found here: http://www.bdcc.co.uk/GoogleCrunch/Crunch.htm
Sherlock
Victurous te Saluto

87th_striker
Brig. General
Posts: 467
Joined: 2001-01-02 23:01:01
Location: Oslo, Norway

Post by 87th_striker » 2008-01-26 10:03:09

WoW, Impressive !!

ranger822
Banned user
Posts: 389
Joined: 2004-07-27 22:01:01
Gaming Interests: Falcon 4.0
Editing Interests: All, I (try) to edit everything.
Location: Beautiful Virginia

Mapcruncher

Post by ranger822 » 2008-01-28 23:12:29

Wowx2

And I haven't even answered the last few points you made Rod!

Return to “Terrain / Theater”

Who is online

Users browsing this forum: ClaudeBot [Bot] and 0 guests